🚽🔧Toilet seat covers with expansion fixing from above. Dowel or anchor (lozenge)? Sintesibagno team toilet seat assembly instructions
Postato da:
 We have seen that most modern floor-standing sanitary ware is positioned flush with the wall. We discussed this in a recent post: “Floor-standing sanitary ware caressed (flush with the wall). Wrap-around and mordant shapes. Top-mounted toilet seats are required.(expa).” where we have highlighted the fact that toilet seats for these sanitary fixtures must have a fixing system from above, the toilet is fitted and then the toilet seat is installed. Even in the case of replacing the toilet seat, the removal and reassembly always takes place without touching the toilet. It would be absurd if the toilet seat had to be disassembled each time to replace the toilet seat, wasting time and money by having to call in a professional installer! Up until a few years ago, only the fixing system known as expansion fixing (dowel) was available. It is called expansion fixing because, like a wall plug, once the expansion kit has been inserted into the hole of the toilet bowl, a screwdriver is used to expand it and anchor it to the toilet bowl (clearly all from above). Let’s look at the installation procedure for this fixing.
Toilet cover fixing with expansion system (dowel)
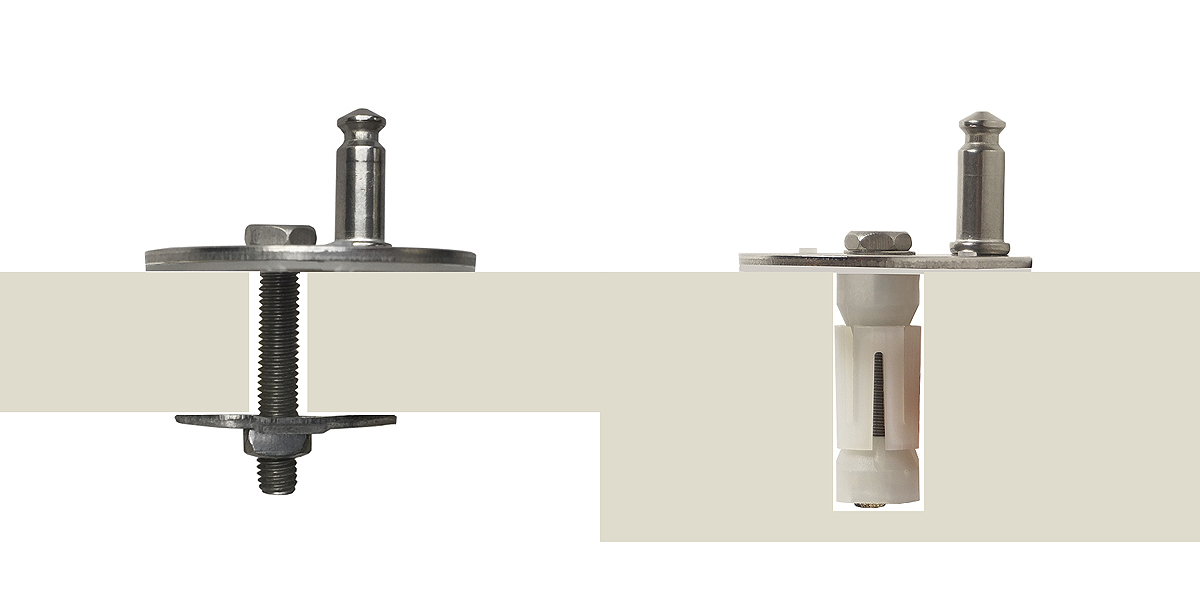
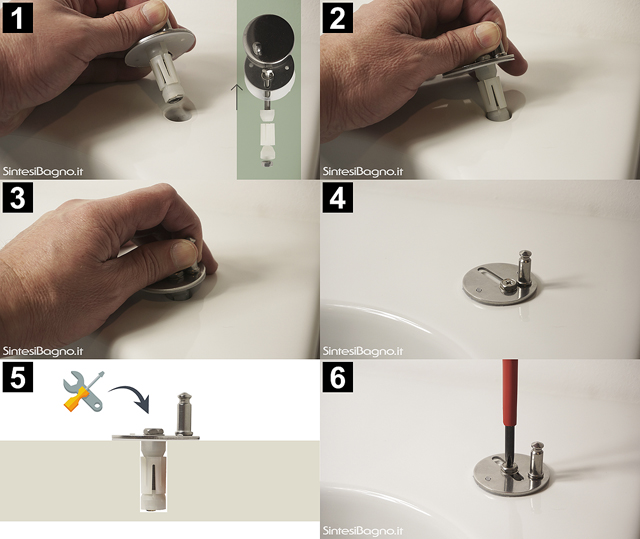
The screw is inserted on the disk with the pin where the plastic/thermoset (or coated wood) part will be fixed from above and then the dowel is placed, which may be PVC or even in some cases rubber from below. Once the dowel is in place, the locknut is placed (in some assembly kits (see photo, there are two locknuts) with the conical part towards the dowel so that when we then tighten the screw it will allow expansion. Once assembly is complete, the kit is inserted into the hole in the sanitary fitting.Once the kit has been inserted in the hole, we will position the upper pin so as to obtain the necessary centre-to-centre distance to enter the cylinders of the toilet cover and obtain the correct size of the same for the toilet bowl on which we are assembling it (we will see this particular phase in the next post). Once the correct position has been found, all that remains for us to do is to lock it onto the toilet bowl by simply expanding the dowel with a screwdriver, clearly from above.
Here is the assembly sequence photographically illustrated

Copyright immagine Sintesibagno Srl. Ogni riproduzione è vietata.
Toilet cover fixing with anchor system (lozenge)
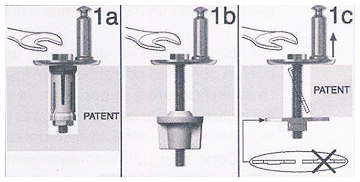
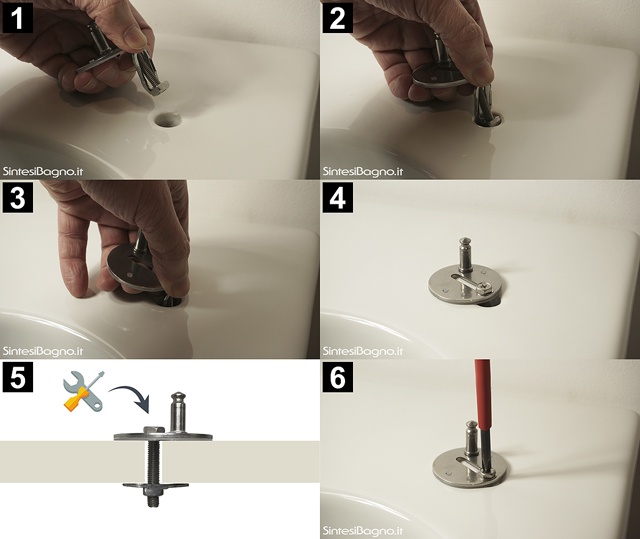
To close the discussion on fixing from above the toilet seats, let us talk about the latest version introduced for fixing from above (in the photo at the beginning of the post shown 1c). It is called anchor fixing. It is a significant improvement on the dowel expansion fixing. In fact, the latter is sometimes difficult to expand (partly because the hole in the ceramic is too big) or if it does expand, it often loosens up as the weeks go by and you have to constantly re-tighten it. This new system in its simplicity is very effective. It is clear that the hole in the sanitary ware must be through; if the hole is closed (blind), one must continue to use the dowel hole. Let us also see here the procedure for fitting the toilet seat cover.Again, we insert the screw on the small disc with pin where we will then attach the plastic/thermoset (or coated wood) part from above and then from below we insert the metal element made into a rhombus/losange and tighten the nut provided. Having done this, we insert the screw with the elements just described into the hole of the pot, holding them vertically. Once the ceramic thickness has been passed, the rhombus element will be positioned horizontally.
Once the kit has been inserted into the hole, we will position the upper pin so as to obtain the necessary centre distance to enter the toilet seat cylinders and obtain the correct size for the toilet bowl on which we are fitting it (we will see this particular phase in the next post). Once the correct position has been found, all that is left to do is to secure it to the toilet bowl simply by holding the screw upwards from above and turning it, the fixing will “anchor” and secure the toilet seat in a stable and durable manner.
Here is the assembly sequence photographically illustrated

Copyright immagine Sintesibagno Srl. Ogni riproduzione è vietata.
We have explained the fixing systems from above of the toilet seats sold in the Sintesibagno catalogue. Now you know how to fit these toilet seats. But do you know which toilet seat you need? We suggest that before you buy a toilet seat, if you do not know the make or model of the toilet seat, you send us an email to info@sintesibagno.it or a WhatsApp message to 3341288978 with two pictures of your sanitary fitting and a few measurements and we will be able to help you choose. Here is the video on how to go about finding a toilet seat cover:
Tag Associati
Categorie Associate
Lorem ipsum dolor sit amet, consectetur adipisicing elit,
sed do eiusmod tempor incididunt ut labore et dolore magna aliqua. Ut enim ad minim veniam,
quis nostrud exercitation ullamco laboris nisi ut aliquip ex ea commodo consequat.
Powered by Passepartout


