


Mounting instructions for coated wooden toilet seats 🚽 with pre-mounted adjustable hinge. The procedure clearly explained by the Sintesibagno team
Postato da:
We have seen in previous posts the assembly instructions for many toilet seats. In the post: “How to fit a thermoset toilet seat cover” we have seen how the toilet seat installation procedure begins by placing the discs with anchor pins on the toilet seat, and once the exact position has been found, we proceed to attach the toilet seat to the toilet. A similar procedure also applies to the covered wooden toilet seats with stainless steel hinge that we have seen in the post: “How to fit a covered wooden toilet seat with stainless steel hinge“. We have talked about the fastening from above (often called expansion fastening), which will also serve in part in the explanations that follow in the post: “Toilet seat covers with expansion fixing from above. Dowel or anchor (lozenge)?” We have talked about the fastening from above (often called expansion fastening), which will also serve in part in the explanations that follow in the post.
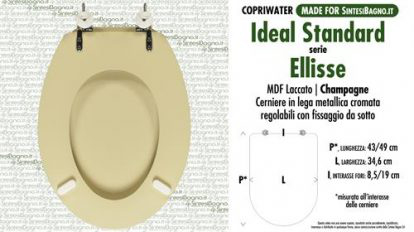 If we look at one of the many data sheets we find on the Sintesibagno website and look at the measurements under P (length), we will notice that two values are specified: 43/49. It happens that some customers interpret this information as the possibility when ordering to specify how long the toilet seat cover they want to receive should be. In reality the wooden part of the template is always the same, but rotating the discs mounted on the hinges will give that range of measurements from…. to… So, as in the product in the picture opposite, with the discs turned inside the template (which is the position in which you will find them in the toilet seat cover when you receive it) the seat will measure 43 cm, rotating the discs and then moving the anchorage point forward thanks to the discs will reach (rotated to the maximum (180°) up to 49 cm, which is the position as seen in the photo of the discs outside the template. The same applies to item I (wheelbase). Which answers the question how does the toilet seat cover have different wheelbase measurements? It is always the rotation of the discs which, by turning to the right or left, tighten or widen the anchoring point of the toilet seat to the toilet bowl.
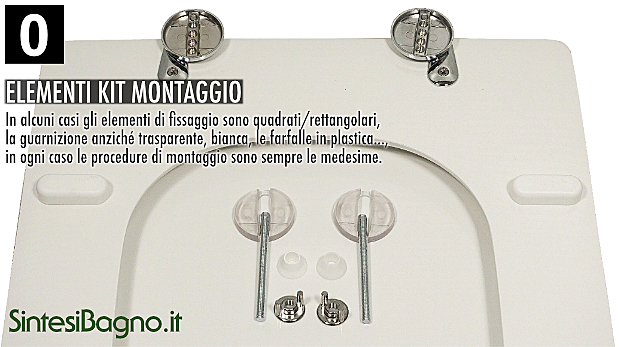
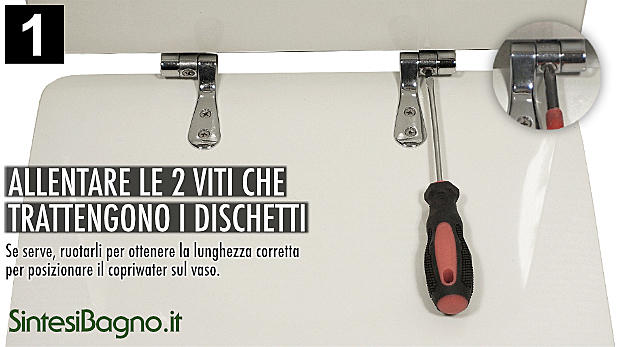
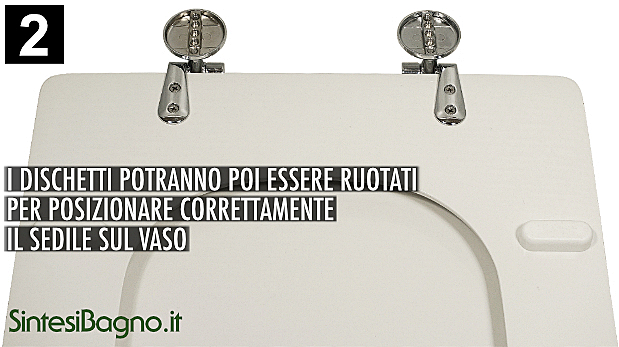
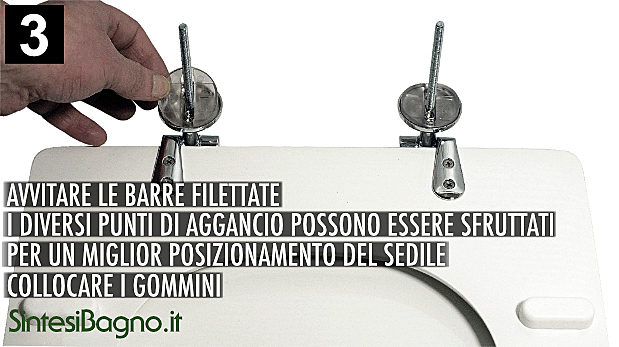
Let’s start with the adjustable hinged toilet seat cover with fixing from underneath. Together with the toilet seat you will have received an envelope with all you need to assemble it: 2 threaded rods, two butterflies (metal or plastic), two white cones (optional) and two gaskets to be placed under the discs (white or transparent plastic). You will have received the toilet seat cover with the discs turned inside out as you can see in the first photo (this is a choice related to transport, the metal parts turned inside out during product delivery greatly reduces possible breakage). It could be that by positioning the toilet seat on the toilet seat, the length and centre distance already coincide and in this case go to point 3 in the pictures. On the other hand, it may be necessary to adjust the hinges, before fitting, to obtain the correct length and centre distance. In this case, let’s start from image 1: as you can see, in order to allow the diskette to rotate (image 2) we must loosen the screw that holds it in place from above, then we will insert the gasket on the diskette and the threaded rod in one of the holes in the diskette at random (image 3), when we then go to position the toilet seat from above we will evaluate by testing which is the most correct hole to use.
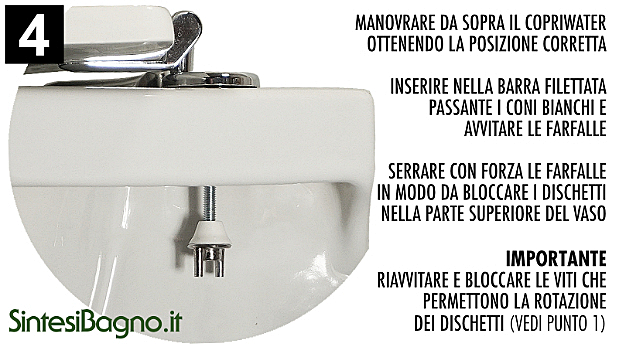
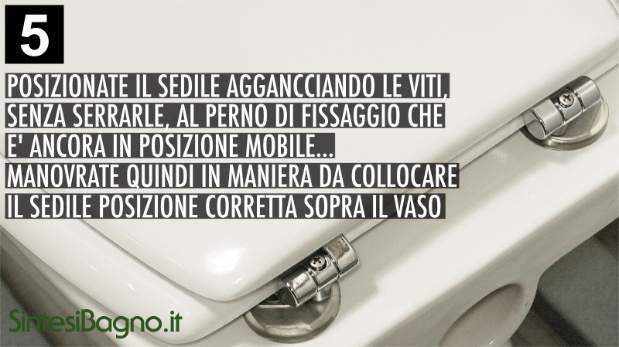
( picture 4) The toilet seat is now ready to be placed on the toilet bowl from above, we will thread the two threaded rods through the holes in the toilet bowl and find the correct position needed to get the precise measurement on the front of the toilet bowl. Once we have found the correct size, from underneath the toilet bowl we will thread the cone upwards on the threaded rod (which serves to keep the screw centred in the hole in the ceramic) and with the tightening butterfly we will lock the toilet seat to the toilet bowl. Last step: from above we lock the small screw which we had loosened to allow the disk to rotate so as to give the toilet seat more stability and avoid unnecessary vibrations which would weaken the hinge over time.
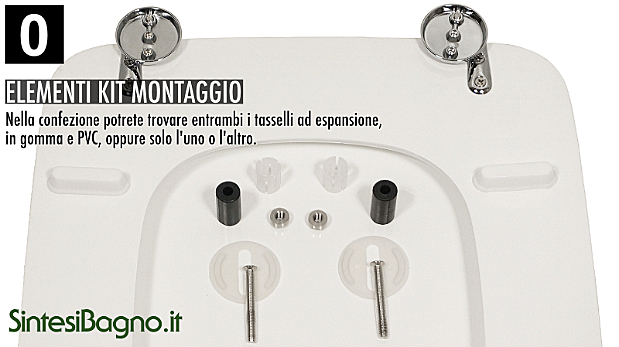
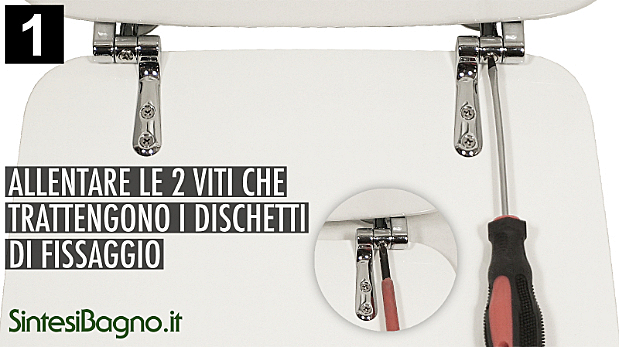
As in the previous model, together with the toilet seat cover you will have received an envelope with the necessary parts for assembly: 2 screws, 2 dowels (in black rubber or white or blue plastic) 2 conical metal or plastic nuts and two gaskets to be placed under the discs (in white or transparent plastic). You will have received the toilet seat cover with the discs turned inside out as you can see in the first photo (this is a choice related to transport, the metal parts turned inside out during delivery of the product greatly reduces possible breakage). It could be that by positioning the toilet seat on the toilet seat, the length and centre distance already coincide and in this case go to point 2 in the pictures. On the other hand, it may be necessary to adjust the hinges, prior to assembly, to obtain the correct length and centre distance. In this case, let’s start with image 1: as you can see, to allow the diskette to rotate (image 2), the screw holding it in place must be loosened from above. With the disc free to rotate, from above.
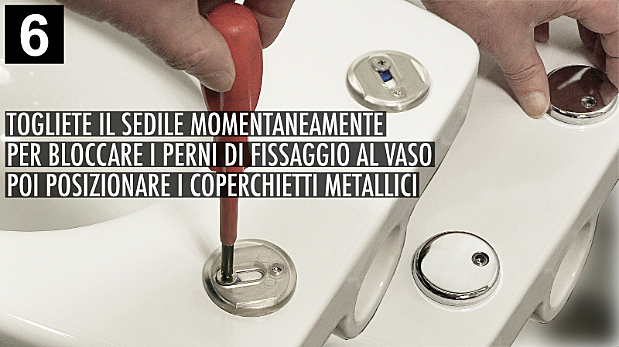
we will insert the screw inside the hole, in the lower part of the disc we will put the gasket, the dowel and the metal conical nut with the narrow part facing upwards (screwed in enough so that it does not fall into the toilet bowl during the movements we will be doing shortly, but without making the dowel expand too much, which would then not pass through the hole in the ceramic) . The toilet seat is now ready to be placed on the toilet bowl from above, we will insert the dowels into the holes in the toilet bowl (photo 3) and find the required size on the front of the toilet bowl. Once we have found the correct size, we will fix the toilet seat to the toilet bowl from above by expanding the dowel with the screwdriver from above (photo 4). Last step: still from above we lock the small screw (photo 5) which we had loosened to allow the rotation of the disc so as to give more stability to the toilet seat and avoid unnecessary vibrations which would weaken the hinge over time.
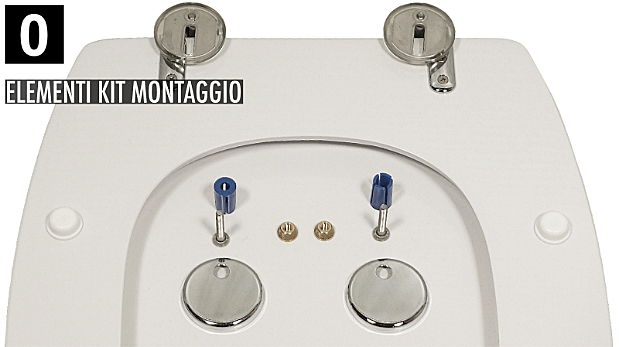
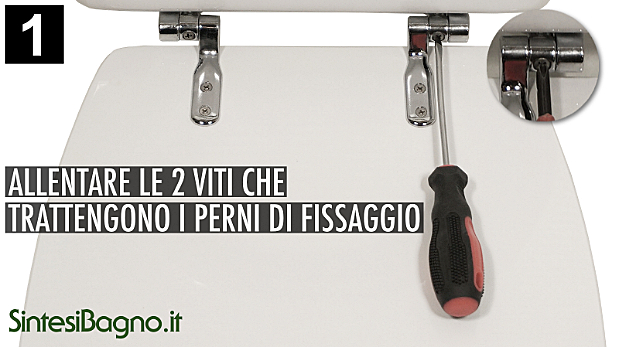
This hinge takes a little longer to assemble, but when the work is finished the result will be optimal and you will not see any holes or screws on the hinge because they will be hidden by the closed chrome finish plate. As in the previous model, together with the toilet seat cover you will have received a bag with the necessary parts for assembly: 2 screws, 2 plugs (in black rubber or white or blue plastic) 2 conical metal or plastic nuts. The round plates you see in the photo are mounted on the disc screwed onto the toilet seat. You will have received the toilet seat cover with the discs turned inside out, as you can see in the first photo (this is a choice related to transport, the metal parts turned inside out during delivery of the product greatly reduces possible breakage). The first thing to do is to unhook the disc from the hinge by acting on the screw in the hinge (photo 1). Once unhooked we will see the two parts that make it up (photo 2), the closed cover plate and the disc with the slot where the screw will be inserted.

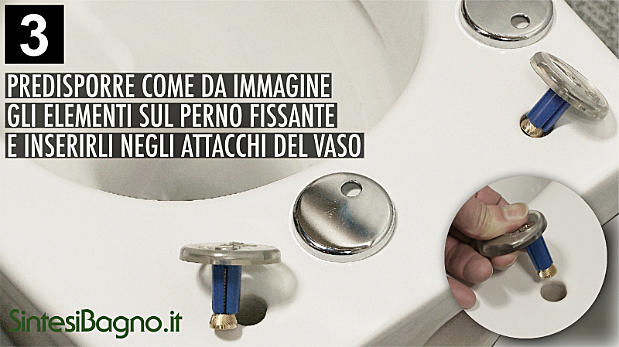
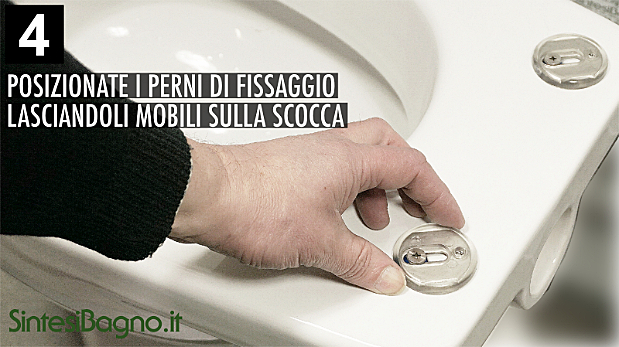
( Picture 3) At this point we will insert the screw into the slot of the diskette and from underneath the dowel with the conical nut facing upwards (screwed in enough so that it doesn’t fall into the toilet bowl during the movements that we will be doing shortly, but without making the dowel expand too much so that it won’t go through the hole on the ceramic). When we have finished we will go and insert the two dowels ready on the disc into the holes on the toilet bowl. To find the correct position we will have to hook the toilet seat to the two discs (the screw must not be tightened completely) and by moving the toilet seat forwards or backwards we will bring it to the size of the toilet bowl on the front (photo 4/5). Find the correct size.
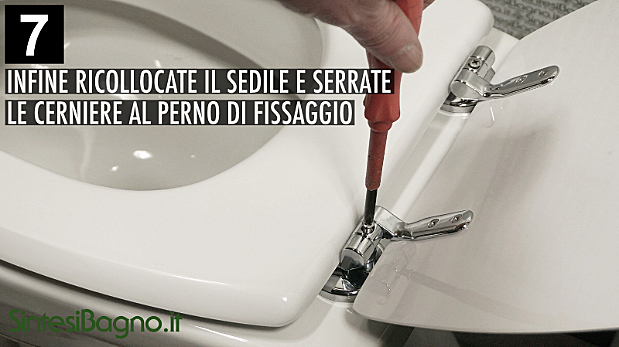
we will unhook the cover plate from the discs again and with the screwdriver, acting from above the toilet bowl, we will expand the dowel, which will enlarge and anchor them to the toilet bowl. We will put on the chrome-plated cover plate and we are almost finished (photo 6). All that remains is to screw the cover plate onto the two discs and complete the job.
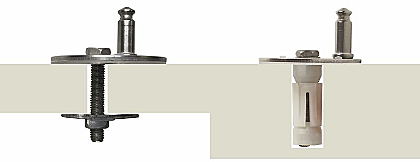
IMPORTANT NOTE: in some WC covers instead of the expansion plug you may find the new fitting called lozenge/anchor. The assembly procedure of the toilet seat is the same, only point 3 changes, where instead of the dowel you will make the lozenge arrangement, which we have explained here: “Toilet seat covers with expansion fixing from above. Dowel or anchor (lozenge)?“
Today, the Sintesibagno team showed you more fitting procedures for the toilet seats that you can find in the online store www.sintesibagno.shop. For more types and instructions on how to fit toilet seats correctly, you can access the fitting section of the catalogue at the following link [ Clic HERE ]
If we look at one of the many data sheets we find on the Sintesibagno website and look at the measurements under P (length), we will notice that two values are specified: 43/49. It happens that some customers interpret this information as the possibility when ordering to specify how long the toilet seat cover they want to receive should be. In reality the wooden part of the template is always the same, but rotating the discs mounted on the hinges will give that range of measurements from…. to… So, as in the product in the picture opposite, with the discs turned inside the template (which is the position in which you will find them in the toilet seat cover when you receive it) the seat will measure 43 cm, rotating the discs and then moving the anchorage point forward thanks to the discs will reach (rotated to the maximum (180°) up to 49 cm, which is the position as seen in the photo of the discs outside the template. The same applies to item I (wheelbase). Which answers the question how does the toilet seat cover have different wheelbase measurements? It is always the rotation of the discs which, by turning to the right or left, tighten or widen the anchoring point of the toilet seat to the toilet bowl.
Chromed metal hinge mounting and adjustment from below
Let’s start with the adjustable hinged toilet seat cover with fixing from underneath. Together with the toilet seat you will have received an envelope with all you need to assemble it: 2 threaded rods, two butterflies (metal or plastic), two white cones (optional) and two gaskets to be placed under the discs (white or transparent plastic). You will have received the toilet seat cover with the discs turned inside out as you can see in the first photo (this is a choice related to transport, the metal parts turned inside out during product delivery greatly reduces possible breakage). It could be that by positioning the toilet seat on the toilet seat, the length and centre distance already coincide and in this case go to point 3 in the pictures. On the other hand, it may be necessary to adjust the hinges, before fitting, to obtain the correct length and centre distance. In this case, let’s start from image 1: as you can see, in order to allow the diskette to rotate (image 2) we must loosen the screw that holds it in place from above, then we will insert the gasket on the diskette and the threaded rod in one of the holes in the diskette at random (image 3), when we then go to position the toilet seat from above we will evaluate by testing which is the most correct hole to use.
( picture 4) The toilet seat is now ready to be placed on the toilet bowl from above, we will thread the two threaded rods through the holes in the toilet bowl and find the correct position needed to get the precise measurement on the front of the toilet bowl. Once we have found the correct size, from underneath the toilet bowl we will thread the cone upwards on the threaded rod (which serves to keep the screw centred in the hole in the ceramic) and with the tightening butterfly we will lock the toilet seat to the toilet bowl. Last step: from above we lock the small screw which we had loosened to allow the disk to rotate so as to give the toilet seat more stability and avoid unnecessary vibrations which would weaken the hinge over time.
Chrome-plated metal hinge mounting and adjustment with top/expansion fixing (central perforated disc)
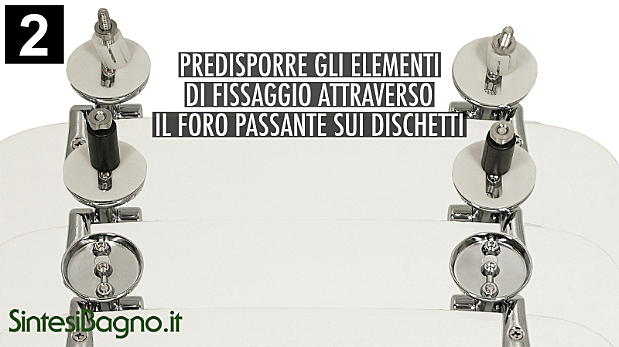
As in the previous model, together with the toilet seat cover you will have received an envelope with the necessary parts for assembly: 2 screws, 2 dowels (in black rubber or white or blue plastic) 2 conical metal or plastic nuts and two gaskets to be placed under the discs (in white or transparent plastic). You will have received the toilet seat cover with the discs turned inside out as you can see in the first photo (this is a choice related to transport, the metal parts turned inside out during delivery of the product greatly reduces possible breakage). It could be that by positioning the toilet seat on the toilet seat, the length and centre distance already coincide and in this case go to point 2 in the pictures. On the other hand, it may be necessary to adjust the hinges, prior to assembly, to obtain the correct length and centre distance. In this case, let’s start with image 1: as you can see, to allow the diskette to rotate (image 2), the screw holding it in place must be loosened from above. With the disc free to rotate, from above.
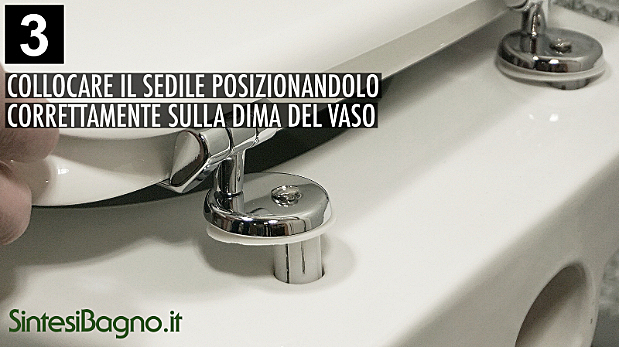
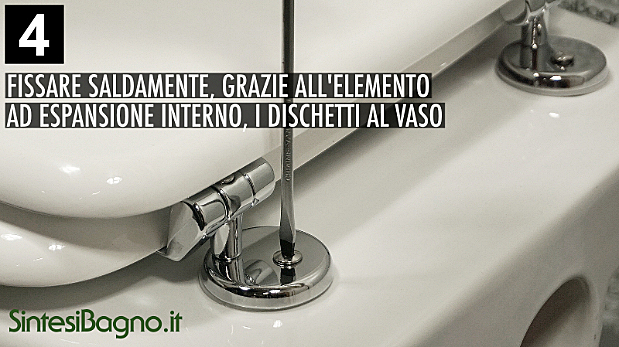
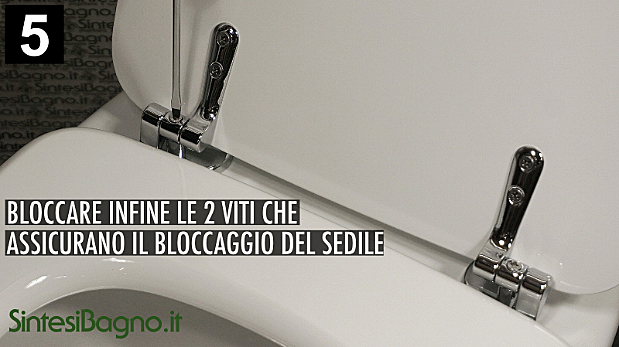
we will insert the screw inside the hole, in the lower part of the disc we will put the gasket, the dowel and the metal conical nut with the narrow part facing upwards (screwed in enough so that it does not fall into the toilet bowl during the movements we will be doing shortly, but without making the dowel expand too much, which would then not pass through the hole in the ceramic) . The toilet seat is now ready to be placed on the toilet bowl from above, we will insert the dowels into the holes in the toilet bowl (photo 3) and find the required size on the front of the toilet bowl. Once we have found the correct size, we will fix the toilet seat to the toilet bowl from above by expanding the dowel with the screwdriver from above (photo 4). Last step: still from above we lock the small screw (photo 5) which we had loosened to allow the rotation of the disc so as to give more stability to the toilet seat and avoid unnecessary vibrations which would weaken the hinge over time.
Chrome-plated metal hinge mounting and adjustment with top/expansion fixing (closed disc)
This hinge takes a little longer to assemble, but when the work is finished the result will be optimal and you will not see any holes or screws on the hinge because they will be hidden by the closed chrome finish plate. As in the previous model, together with the toilet seat cover you will have received a bag with the necessary parts for assembly: 2 screws, 2 plugs (in black rubber or white or blue plastic) 2 conical metal or plastic nuts. The round plates you see in the photo are mounted on the disc screwed onto the toilet seat. You will have received the toilet seat cover with the discs turned inside out, as you can see in the first photo (this is a choice related to transport, the metal parts turned inside out during delivery of the product greatly reduces possible breakage). The first thing to do is to unhook the disc from the hinge by acting on the screw in the hinge (photo 1). Once unhooked we will see the two parts that make it up (photo 2), the closed cover plate and the disc with the slot where the screw will be inserted.
( Picture 3) At this point we will insert the screw into the slot of the diskette and from underneath the dowel with the conical nut facing upwards (screwed in enough so that it doesn’t fall into the toilet bowl during the movements that we will be doing shortly, but without making the dowel expand too much so that it won’t go through the hole on the ceramic). When we have finished we will go and insert the two dowels ready on the disc into the holes on the toilet bowl. To find the correct position we will have to hook the toilet seat to the two discs (the screw must not be tightened completely) and by moving the toilet seat forwards or backwards we will bring it to the size of the toilet bowl on the front (photo 4/5). Find the correct size.
we will unhook the cover plate from the discs again and with the screwdriver, acting from above the toilet bowl, we will expand the dowel, which will enlarge and anchor them to the toilet bowl. We will put on the chrome-plated cover plate and we are almost finished (photo 6). All that remains is to screw the cover plate onto the two discs and complete the job.
IMPORTANT NOTE: in some WC covers instead of the expansion plug you may find the new fitting called lozenge/anchor. The assembly procedure of the toilet seat is the same, only point 3 changes, where instead of the dowel you will make the lozenge arrangement, which we have explained here: “Toilet seat covers with expansion fixing from above. Dowel or anchor (lozenge)?“
Today, the Sintesibagno team showed you more fitting procedures for the toilet seats that you can find in the online store www.sintesibagno.shop. For more types and instructions on how to fit toilet seats correctly, you can access the fitting section of the catalogue at the following link [ Clic HERE ]
Tag Associati
Categorie Associate
Lorem ipsum dolor sit amet, consectetur adipisicing elit,
sed do eiusmod tempor incididunt ut labore et dolore magna aliqua. Ut enim ad minim veniam,
quis nostrud exercitation ullamco laboris nisi ut aliquip ex ea commodo consequat.

Powered by Passepartout